A trusty hand mixer is a kitchen workhorse, making light work of everything from whipping cream to mixing batter. However, over time, the constant bending, pulling, and storing can take a toll on its power cord, leading to frustrating and potentially dangerous fraying. An exposed or damaged cord isn’t just an inconvenience; it’s a significant electrical hazard that demands immediate attention. Understanding how to safely assess and address a frayed hand mixer cord is crucial for protecting yourself, your home, and extending the life of your beloved appliance.
Hand Mixer Cord Fraying: Understanding the Risks
Hand mixer cords are designed for flexibility, but this constant motion, along with improper storage, accidental pinches, or simply old age, can cause the outer insulation to crack, split, or fray. When the protective outer jacket wears away, it can expose the inner insulating layers or, critically, the live electrical wires themselves.
The dangers of a frayed electrical cord are serious and should never be underestimated. Exposed wires can lead to:
- Electrical Shock: Direct contact with live wires can cause a painful and potentially fatal electrical shock. Even minor shocks are a warning sign of a severe underlying problem.
- Fire Hazard: A damaged cord can overheat, especially if wires are exposed or shorting internally. This heat can ignite nearby flammable materials, leading to an electrical fire.
- Appliance Damage: Intermittent power or short circuits from a frayed cord can damage the internal components of your hand mixer, leading to premature failure.
Any visible damage to your hand mixer’s cord, no matter how small, warrants immediate action. Discontinue use immediately if you notice any fraying, cuts, or unusual heat from the cord.
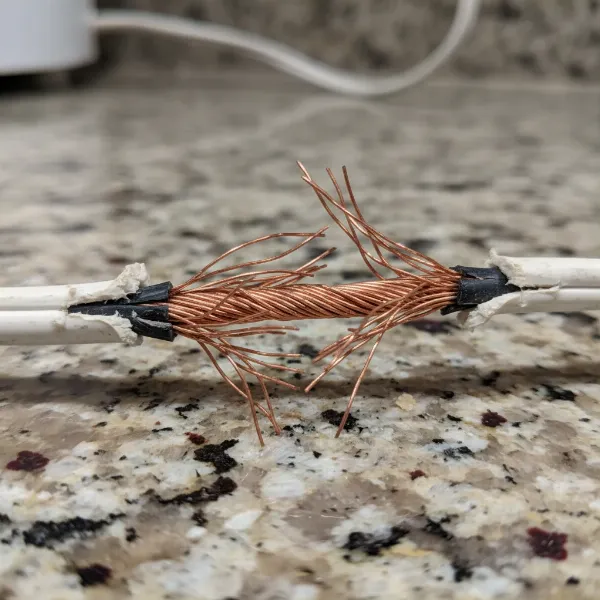 Close-up of a damaged hand mixer cord with exposed wires, illustrating electrical hazards.
Assess the Damage: Repair or Replace?
When faced with a frayed hand mixer cord, the first critical step is to accurately assess the extent of the damage. This evaluation will determine whether a safe repair is even possible or if replacement is the only viable option. Your safety is paramount, so always err on the side of caution.
Minor Damage (Outer Insulation Only)
If the damage is purely superficial – a small scuff or minor abrasion on the outermost rubber or plastic jacket, with absolutely no exposed inner wires or signs of deeper cuts – a temporary or cosmetic repair might be considered.
- Electrical Tape: For very minor surface abrasions, electrical tape can offer a quick, temporary fix for insulation. Wrap it tightly and smoothly around the damaged area, extending well beyond the frayed section. However, be aware that electrical tape may not fully restore the original strength or flexibility of the cord, and it can degrade over time.
- Heat Shrink Tubing: A more durable solution for superficial fraying is heat shrink tubing. Slide a piece of appropriately sized tubing over the damaged section, then apply heat (with a heat gun or even a hairdryer) to shrink it snugly around the cord. This provides a more robust and longer-lasting protective layer than tape.
|
Our Picks for the Best Hand mixer in 2026
As an Amazon Associate I earn from qualifying purchases.
|
||
| Num | Product | Action |
|---|---|---|
| 1 | 600W Electric Hand Mixer Kitchen Handheld Mixer 10 Speed Powerful with Turbo for Baking Cake Lightweight & Personal Electric Mixer with Egg Baking Beaters Dough Hooks, Whipping Mixing Cookies |

|
| 2 | KitchenAid 5-Speed Ultra Power Hand Mixer - KHM512, Contour Silver |
|
| 3 | KitchenAid 5 Ultra Power Speed Hand Mixer - KHM512, Aqua Sky |
|
| 4 | OVENTE 5-Speed Corded Electric Hand Mixer with Stainless Steel Whisks, Compact Portable Design with Snap-On Storage Case,150W Lightweight Handheld Mixer for Baking & Cooking, Black HM151B |
|
| 5 | KitchenAid 5-Speed Ultra Power Hand Mixer |
|
| 6 | OVENTE 5-Speed Electric Hand Mixer with Stainless Steel Mixing Whisk, Snap-On Storage Case, Portable & Lightweight 150W Motor, Compact Handheld Mixer for Baking, Blending or Cooking, Red HM151R |
|
| 7 | OVENTE 5-Speed Corded Electric Hand Mixer with Stainless Steel Whisks, Compact Portable Design with Snap-On Storage Case,150W Lightweight Handheld Mixer for Baking & Cooking, White HM151W |
|
| 8 | Hamilton Beach 6-Speed Electric Hand Mixer with Whisk, Traditional Beaters, Snap-On Storage Case, 250 Watts, White |
|
| 9 | Wellness Extract Multi-Speed Rechargeable Electric Milk Frother, Li-ion Battery Powered – Certified Safe, Ideal for Coffee, Matcha, Protein & Colostrum |
|
| 10 | Maestri House Rechargeable Milk Frother with Stand, LunaFro Handheld Electric Foam Maker Waterproof Detachable Stainless Steel Whisk Drink Mixer Foamer for Lattes, Cappuccino |
|
Important Note: These minor repairs are strictly for cosmetic or very shallow surface damage. If there’s any doubt about the integrity of the inner insulation or wires, do not attempt this type of repair.
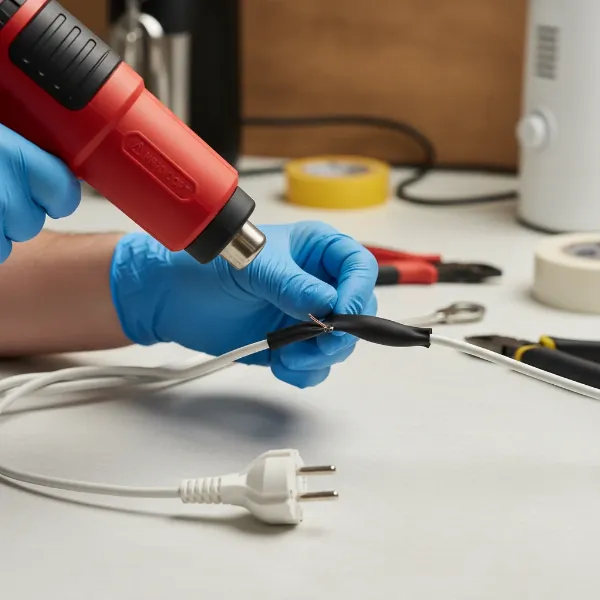 A hand showing the application of heat shrink tubing to a minimally frayed hand mixer cord.
Significant Damage (Exposed Wires, Deep Cuts, or Damage Near Connections)
For any damage that exposes the copper wires, involves deep cuts through the outer jacket, or occurs near the plug end or where the cord enters the hand mixer, the overwhelming recommendation is to replace the entire cord or, in many cases, the appliance itself.
Why the strong emphasis on replacement? Flexible appliance cords, like those on hand mixers, are typically made of smaller gauge wires. Splicing these cords in the middle creates a weak point that can be prone to further damage, short-circuiting, or overheating. Professional electrical safety standards generally discourage splicing small-gauge flexible cords, as it’s difficult to ensure the repair matches the original cord’s strength, insulation, and protective characteristics.
“When dealing with electrical cords on frequently used appliances, safety should always be your top priority. While minor cosmetic fixes might seem appealing, any damage that compromises the inner wires demands a professional replacement of the cord or the appliance. The potential risks of shock or fire far outweigh any cost savings from a DIY splice.” – Eleanor Vance, Certified Electrical Safety Specialist
- Damage Near the Plug: If the fraying is only at the very end near the plug, you might be able to replace just the plug. This involves cutting off the damaged section and wiring a new, UL-listed replacement plug. This option is only viable if the rest of the cord is in perfect condition.
- Damage Near the Mixer Entry Point or Mid-Cord: This is the most problematic scenario. Replacing the entire cord typically requires opening the hand mixer, desoldering or disconnecting the old cord, and installing a new, identical replacement cord. This can be complex and may void your appliance’s warranty. If you’re not experienced with appliance repair, or if replacement parts are unavailable, buying a new hand mixer is the safest and often most practical solution.
Tools You’ll Need (If Repairing is Viable)
If you’ve determined that a repair (such as replacing a plug or applying heat shrink for superficial damage) is safe and appropriate for your hand mixer cord, gather these essential tools:
- Safety Glasses: Protect your eyes from stray wire fragments.
- Wire Cutters: For cleanly severing the damaged cord section.
- Wire Strippers: Essential for removing insulation without damaging the delicate copper strands. Ensure they match the gauge of your hand mixer’s wires.
- Electrical Tape: For wrapping and insulating, particularly if not using heat shrink, or for added protection over heat shrink.
- Heat Shrink Tubing: (Recommended) Various sizes to insulate individual wires and the entire cord.
- Heat Gun or Hair Dryer: To activate the heat shrink tubing.
- Soldering Iron and Solder: (Optional, but recommended for more secure wire connections if splicing is absolutely necessary and allowed by cord gauge/standards)
- Multimeter (Optional): To test for continuity and ensure no short circuits after repair.
- Replacement Plug (if applicable): A new, UL-listed plug matching your cord type (2-prong or 3-prong grounded).
Step-by-Step Guide for Minor Cord Repair (Superficial Only)
For very minor, superficial damage where only the outer jacket is scuffed and no inner wires are exposed, heat shrink tubing offers a more robust fix than tape alone.
- Prioritize Safety: Absolutely unplug your hand mixer from the wall outlet. Never work on a cord that is still connected to power.
- Inspect Thoroughly: Re-examine the damage. If any copper wire is visible, or if the cord feels soft, brittle, or shows any signs of internal damage beyond a surface abrasion, do not proceed with this repair. Replace the cord or appliance instead.
- Clean the Area: Ensure the damaged section is clean and dry to allow for proper adhesion or shrinking.
- Cut Heat Shrink Tubing: Cut a piece of heat shrink tubing that is long enough to fully cover the damaged area, plus an extra inch on each side. The tubing should be wide enough to easily slide over the cord, but not excessively loose.
- Slide and Shrink: Slide the heat shrink tubing over the frayed section, centering it. Using a heat gun on a low setting (or a hair dryer), apply even heat around the tubing. You will see the tubing contract and seal tightly around the cord. Continue heating until it is snug and firm.
- Allow to Cool: Let the repaired section cool completely before handling or plugging in the appliance.
- Test Carefully: Plug the hand mixer into an outlet (preferably one with a GFCI for added safety) and carefully observe the repaired area for any signs of heat or arcing during initial use. If anything seems amiss, unplug immediately.
Step-by-Step Guide for Replacing a Plug (If Damage is at the Plug End)
If the damage is isolated to the plug end and the rest of the cord is in excellent condition, replacing the plug can be a viable solution.
- Unplug and Prepare: Disconnect the hand mixer from the power outlet. Open the new replacement plug according to its manufacturer’s instructions, typically by removing a cover or screws.
- Cut Off Damaged Plug: Using wire cutters, carefully cut off the old, damaged plug, ensuring you cut beyond any frayed sections.
- Strip the Outer Jacket: With wire strippers, carefully remove about 1 to 1.5 inches of the outer cord jacket to expose the individual insulated wires inside (typically two or three: hot, neutral, and ground). Be cautious not to cut the inner wire insulation.
- Strip Inner Wires: Strip about 1/2 to 3/4 inch of insulation from the end of each individual inner wire to expose the copper strands. Twist the copper strands tightly to prevent fraying.
- Identify Wires:
- Green wire: Ground (connects to the green screw on the plug).
- White wire: Neutral (connects to the silver screw on the plug).
- Black or colored wire: Hot (connects to the brass or darker colored screw on the plug).
- If no color coding: Often, one wire has a ridge or marking for identification. Consult the new plug’s instructions for proper orientation.
- Connect Wires to New Plug: Loosen the screws on the new plug’s terminals. Loop each exposed copper wire clockwise around its corresponding screw terminal (green to green screw, white to silver, black/colored to brass). Tighten the screws securely, ensuring no stray copper strands are touching other terminals.
- Secure and Reassemble: Ensure the wires are neatly tucked inside the plug housing and that the cord’s outer jacket is clamped securely by the plug’s strain relief mechanism. Reassemble the plug, making sure all screws are tightened.
- Test Thoroughly: Plug the hand mixer into a GFCI outlet and test its function. Observe for any unusual behavior, warmth, or odors.
When to Replace the Entire Hand Mixer Cord (or the Mixer)
While some minor cord issues can be safely addressed, there are definitive scenarios where replacing the entire cord or, indeed, the entire hand mixer is the only safe option.
- Deep Cuts or Exposed Copper Mid-Cord: If the internal copper wires are exposed anywhere along the middle of the cord, especially if the cord is frequently bent, a repair is unreliable and hazardous. Replacing the entire cord is necessary.
- Damage Near Appliance Entry Point: Fraying or breakage where the cord enters the hand mixer is common due to repetitive stress. Repairing this often requires dismantling the mixer, which can be complicated and may void warranties.
- Old, Brittle, or Cracked Cord: If the entire cord feels stiff, brittle, or shows multiple cracks along its length, it indicates widespread degradation of the insulation. A single repair won’t solve the underlying issue, and the cord should be fully replaced.
- Uncertainty About Repair Safety: If you are ever unsure about your ability to perform a repair safely, or if you question the integrity of the cord after a repair, do not use the appliance. Electrical safety is not worth gambling.
- Cost-Effectiveness: Sometimes, the cost and effort of sourcing a replacement cord, and performing a complex internal repair on an older or inexpensive hand mixer, can outweigh the cost of simply buying a new one.
Consider professional repair if the cord needs full replacement and you’re uncomfortable with internal appliance work. However, for many hand mixers, purchasing a new, reliable model might be the most straightforward and safest choice.
Preventing Future Cord Fraying
Proactive care can significantly extend the life of your hand mixer’s cord and prevent hazardous fraying.
- Proper Storage: Avoid tightly winding or crimping the cord. Instead, coil it loosely, using a cord tie or Velcro strap if needed. Some hand mixers have built-in cord wraps, which should be used gently.
- Gentle Handling: Never yank the plug from the outlet by pulling on the cord itself. Always grasp the plug housing.
- Avoid Pinching: Be mindful of where the cord lies during use and storage. Avoid closing cabinet doors, drawers, or placing heavy objects on the cord, which can pinch and damage the insulation.
- Regular Inspection: Periodically inspect the entire length of your hand mixer’s cord for any signs of wear, cuts, or heat discoloration. Address any minor issues promptly or replace the cord if damage is significant.
- Keep Away from Heat and Water: Store and use your mixer in environments free from excessive heat, sharp edges, and moisture, which can degrade cord insulation.
Conclusion
A frayed hand mixer cord is more than just an inconvenience; it’s a serious electrical hazard that demands immediate attention. While minor superficial damage might be temporarily addressed with electrical tape or heat shrink tubing, any exposed inner wires, deep cuts, or damage near the plug or appliance entry points necessitate a more thorough, and often professional, solution. Prioritizing safety means understanding when to perform a careful, appropriate repair and when to make the crucial decision to replace the entire cord or even the hand mixer itself. By adhering to proper inspection, repair, and preventative maintenance, you can ensure your hand mixer remains a safe and reliable tool in your kitchen.
What steps will you take today to ensure the safety and longevity of your kitchen appliances’ cords?
Frequently Asked Questions
Can I just use electrical tape for any frayed cord?
Electrical tape is suitable for very minor, superficial abrasions on the outer jacket of a cord where no inner wires are exposed. However, for deep cuts, exposed copper, or any damage affecting the cord’s structural integrity, electrical tape is not a safe or long-term solution and could lead to electrical hazards.
How do I know if my hand mixer cord is beyond repair?
If the damage exposes the copper wires, involves a deep cut through multiple layers of insulation, occurs close to the plug or where the cord enters the mixer, or if the entire cord is old, brittle, or cracked, it is generally beyond safe repair for a DIY enthusiast. In these cases, replacement of the cord or the appliance is recommended.
Is it difficult to replace an entire hand mixer cord?
Replacing an entire hand mixer cord can be moderately to highly difficult, as it often requires opening the appliance, desoldering or disconnecting internal wires, and carefully rewiring a new cord. This process can vary greatly by mixer model and may require specialized tools and electrical knowledge.
Should I consult an electrician for a frayed hand mixer cord?
For significant cord damage, especially if you’re uncomfortable with electrical work or unsure about the safety of a repair, consulting a qualified electrician or appliance repair professional is highly recommended. They can assess the damage and advise on the safest course of action, whether it’s a repair or replacement.