The hand mixer is a workhorse in any kitchen, indispensable for everything from fluffy whipped cream to perfectly blended batter. Yet, with every swirl and beat, a subtle enemy begins to gather: flour dust. This seemingly innocent powder, along with other debris, inevitably finds its way into the mixer’s ventilation vents. Over time, this accumulation becomes more than just an eyesore; it’s a silent threat to your appliance’s performance and longevity. A clogged motor struggles to cool itself, leading to overheating, potential damage, and an untimely demise for your beloved kitchen gadget.
This comprehensive guide will equip you with the knowledge and techniques to effectively clean your hand mixer’s vents and eradicate stubborn flour dust. We’ll walk you through the essential tools, step-by-step cleaning procedures, and vital preventive measures to ensure your hand mixer remains efficient, hygienic, and ready for countless culinary adventures. Say goodbye to dusty vents and hello to a mixer that performs like new.
The Unseen Threat: Why Hand Mixer Vents Need Your Attention
The internal workings of your hand mixer, particularly its motor, generate heat during operation. To prevent overheating, manufacturers design mixers with vents, allowing air to circulate and cool the motor. When flour dust, batter residue, or other debris clog these crucial vents, airflow is significantly restricted.
This blockage forces the motor to work harder, generating even more heat and eventually leading to premature wear and potential breakdown. Beyond performance issues, accumulated food particles can become a breeding ground for bacteria, compromising kitchen hygiene. Regularly cleaning these vents is not just about aesthetics; it’s a critical maintenance step that directly impacts your mixer’s health, efficiency, and your food’s safety.
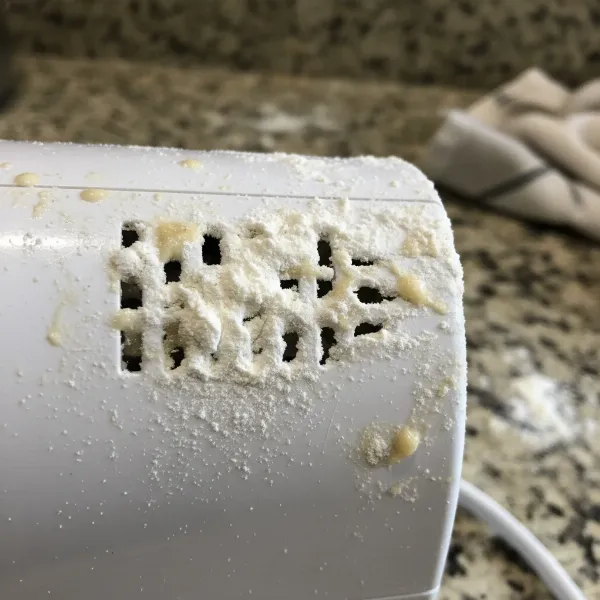 Hand mixer with clogged vents from flour dust, highlighting maintenance need.
Essential Tools for a Thorough Hand Mixer Cleaning
Before you begin, gathering the right tools will make the cleaning process far more efficient and effective. Most of these items are likely already in your home.
Here’s what you’ll need:
- Soft Brush or Dry Cloth: Ideal for sweeping away loose surface debris without scratching. A clean pastry brush or a soft, lint-free cloth works well.
- Compressed Air (Canned Air): This is your most powerful ally for dislodging flour dust deep within the vents and hard-to-reach internal areas. Ensure you use short, controlled bursts.
- Small Brush, Toothbrush, or Cotton Swabs: Perfect for tackling stubborn, caked-on flour and grime in tight crevices around buttons, seams, and smaller vent openings.
- Slightly Damp Cloth: For wiping down the exterior housing. Use water or a very mild solution of water and a few drops of dish soap.
- Optional – Toothpicks or Baby Nasal Aspirator: Toothpicks can meticulously pick out trapped debris in fine cracks. A clean baby nasal aspirator can serve as an effective alternative to compressed air for targeted puffs of air if canned air isn’t available.
Always remember the golden rule of appliance cleaning: safety first. Before you even think about reaching for your cleaning tools, ensure your hand mixer is completely unplugged from the power outlet.
Step-by-Step Guide: Banishing Dust from Your Hand Mixer Vents
With your tools ready and your mixer safely unplugged, it’s time to tackle that flour dust head-on. Follow these steps for a comprehensive clean that will leave your hand mixer looking and performing its best.
1. Initial Surface Cleaning
|
Our Picks for the Best Hand mixer in 2026
As an Amazon Associate I earn from qualifying purchases.
|
||
| Num | Product | Action |
|---|---|---|
| 1 | KitchenAid 5-Speed Ultra Power Hand Mixer - KHM512, Contour Silver |

|
| 2 | Wellness Extract Multi-Speed Rechargeable Electric Milk Frother, Li-ion Battery Powered – Certified Safe, Ideal for Coffee, Matcha, Protein & Colostrum |
|
| 3 | Maestri House Rechargeable Milk Frother with Stand, LunaFro Handheld Electric Foam Maker Waterproof Detachable Stainless Steel Whisk Drink Mixer Foamer for Lattes, Cappuccino |
|
| 4 | 600W Electric Hand Mixer Kitchen Handheld Mixer 10 Speed Powerful with Turbo for Baking Cake Lightweight & Personal Electric Mixer with Egg Baking Beaters Dough Hooks, Whipping Mixing Cookies |
|
| 5 | KitchenAid 5 Ultra Power Speed Hand Mixer - KHM512, Aqua Sky |
|
| 6 | OVENTE 5-Speed Corded Electric Hand Mixer with Stainless Steel Whisks, Compact Portable Design with Snap-On Storage Case,150W Lightweight Handheld Mixer for Baking & Cooking, Black HM151B |
|
| 7 | OVENTE 5-Speed Corded Electric Hand Mixer with Stainless Steel Whisks, Compact Portable Design with Snap-On Storage Case,150W Lightweight Handheld Mixer for Baking & Cooking, White HM151W |
|
| 8 | KitchenAid 5-Speed Ultra Power Hand Mixer |
|
| 9 | Hamilton Beach 6-Speed Electric Hand Mixer with Whisk, Traditional Beaters, Snap-On Storage Case, 250 Watts, White |
|
| 10 | OVENTE 5-Speed Electric Hand Mixer with Stainless Steel Mixing Whisk, Snap-On Storage Case, Portable & Lightweight 150W Motor, Compact Handheld Mixer for Baking, Blending or Cooking, Red HM151R |
|
Begin by removing any loose flour, crumbs, or dried batter from the mixer’s exterior. Use your soft brush or a dry cloth to gently sweep across the motor housing, around the beater ejector buttons, speed controls, and especially over and around the vent openings. This initial pass prevents loose debris from being pushed further into the appliance during deeper cleaning.
2. Deep Clean Vents with Compressed Air
This step is crucial for clearing obstructed vents. Point the nozzle of the compressed air can directly at the ventilation slots. Use short, sharp bursts of air, not a continuous stream, to dislodge and blow out accumulated flour dust. It’s often helpful to hold the mixer at various angles, including upside down, to ensure gravity assists in expelling the debris rather than pushing it deeper into the motor. Continue until you no longer see dust plumes emerging.
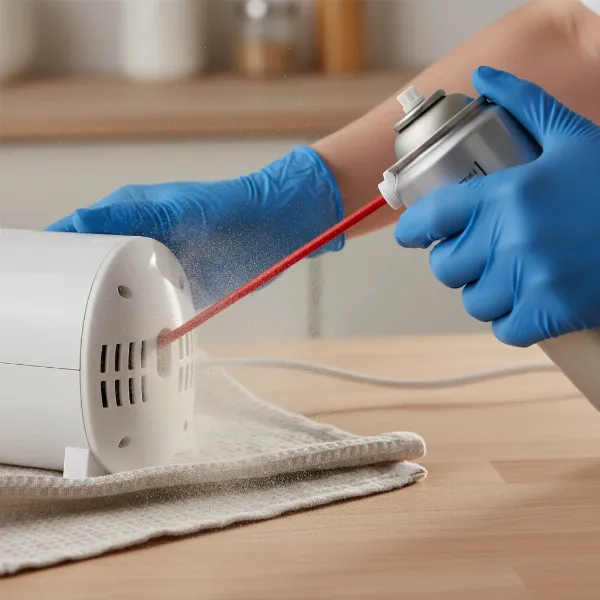 Person using compressed air to clean flour dust from hand mixer vents.
3. Targeting Stubborn Grime in Crevices
Flour dust can become surprisingly stubborn, particularly when mixed with residual oils or moisture from cooking. For any caked-on flour or grime clinging to the edges of the vents, around the control buttons, or in the seams of the mixer’s housing, deploy your small brush, dry toothbrush, or cotton swabs. Gently work the bristles or swab into these tight spots, coaxing out any remaining particles. A toothpick can be remarkably effective for meticulously picking out lodged debris from very fine cracks.
4. Wiping Down the Exterior
Once the internal vents and crevices are clear, it’s time to clean the outer casing. Lightly dampen a soft cloth with plain water or a solution of water and a tiny amount of mild dish soap. Carefully wipe down the entire exterior of the hand mixer, including the handle, controls, and even the power cord. Pay close attention not to allow any liquid to seep into the vents, attachment holes, or other electrical components. The goal is to clean the surface without introducing moisture into the sensitive internal parts.
5. Thorough Drying
After wiping, use a separate, clean, and dry cloth to thoroughly wipe down all surfaces. It is absolutely imperative that your hand mixer is completely dry before you consider plugging it back in or storing it. Moisture can cause electrical damage or even create a shock hazard. Allow it to air dry for an additional period in a well-ventilated area to ensure all internal components are free from any dampness.
Advanced Cleaning and Disassembly Considerations
For most home bakers and cooks, the steps outlined above will be more than sufficient to keep a hand mixer in excellent working condition. However, for those with significant experience in appliance maintenance or facing exceptionally heavy flour accumulation, the idea of partial disassembly might cross your mind. Some older or specific hand mixer models might allow for the removal of certain outer panels or covers with a slim screwdriver to access deeply embedded dust.
“While routine cleaning keeps your mixer running smoothly, remember that unnecessary disassembly can void warranties or lead to improper reassembly, causing more harm than good. Always consult your user manual and proceed with extreme caution.” – Your Name (Admin of handmixerguide.com), Experienced Hand Mixer Technician
Proceeding with disassembly should be approached with extreme caution and only if you are confident in your technical abilities. Always refer to your mixer’s specific user manual for any manufacturer-approved maintenance or disassembly instructions. In most cases, it’s best to leave internal repairs and deep cleaning that require opening the casing to certified technicians.
Maintaining a Spotless Mixer: Preventive Measures
An ounce of prevention is worth a pound of cure, especially when it comes to kitchen appliances. Incorporating a few simple habits into your routine can significantly reduce flour dust buildup and extend the life of your hand mixer.
- Immediate Wipe-Down: After each use, take a minute to wipe down the exterior of your mixer with a dry cloth. This prevents wet batter or flour from drying and caking onto the surface or hardening around the vents, making future cleaning much easier.
- Proper Storage: Store your hand mixer in a clean, dry environment, preferably in a cabinet or drawer where it’s protected from airborne dust and kitchen grease. Using a dedicated appliance cover or even a simple tea towel can offer an extra layer of protection against dust settling on the vents.
- Regular Cleaning Schedule: Depending on how frequently you use your hand mixer, establish a cleaning schedule. A quick wipe-down after every use, a thorough vent cleaning once a month, and a more detailed external clean every few months will ensure it remains in top shape.
Conclusion
A well-maintained hand mixer is a reliable partner in the kitchen, and keeping its vents free from flour dust is paramount to its performance and longevity. By committing to regular cleaning and adopting smart preventive measures, you ensure your appliance runs efficiently, avoids premature wear from overheating, and maintains optimal hygiene. The steps outlined in this guide – from initial dusting to targeted compressed air use and thorough drying – are straightforward yet incredibly impactful.
Embrace these habits, and your hand mixer will continue to be a powerful, consistent tool for all your baking and cooking endeavors for years to come. What’s your go-to trick for keeping your hand mixer spotless?
FAQ
How often should I clean my hand mixer’s vents?
For regular users, a thorough vent cleaning using compressed air and brushes is recommended at least once a month. If you use your hand mixer very frequently, or with particularly dusty ingredients like flour, consider a deep vent clean every two to three weeks to prevent significant buildup and ensure optimal airflow.
Can I use water to clean inside my hand mixer?
Absolutely not. Water should never be used inside the motor housing or directed into the vents of your hand mixer. Moisture can cause severe electrical damage, lead to corrosion, or create a dangerous short circuit. Only use a slightly damp cloth for external wiping, ensuring no liquid enters the internal components, and always dry thoroughly.
What if I don’t have compressed air?
If compressed air isn’t available, you can use a clean, dry paintbrush, a soft-bristled toothbrush, or even a baby nasal aspirator to blow targeted puffs of air into the vents. These tools can help dislodge and sweep away accumulated flour dust, though they may require more effort and time than compressed air.
How do I clean my hand mixer’s beaters?
Cleaning beaters is simpler than the main unit. Most beaters are dishwasher-safe; otherwise, wash them immediately after use in warm, soapy water to prevent batter from hardening. A quick trick is to reattach them, immerse them in a bowl of warm, soapy water, and run the mixer on low for a few seconds to self-clean.
Can flour dust damage my hand mixer?
Yes, flour dust can significantly damage your hand mixer. When it accumulates in the vents, it restricts airflow, causing the motor to overheat. This overheating can lead to reduced efficiency, strain on internal components, and ultimately shorten the lifespan of the appliance. It can also create a potential fire hazard if not addressed.