Imagine spreading rich, creamy butter on your morning toast, knowing it was crafted by your own hands just moments ago. While the idea of making butter from scratch might seem like a relic from a bygone era, it’s surprisingly simple and incredibly rewarding, especially with the help of a common kitchen tool: the hand mixer. This guide will walk you through everything you need to know, transforming ordinary heavy cream into extraordinary homemade butter.
What is Homemade Butter and Why Make It?
At its core, butter is simply the fat solids separated from cream. Historically, this was achieved through vigorous churning, but modern appliances like the hand mixer make the process accessible to any home cook. Making your own butter offers several compelling advantages: unparalleled freshness, the ability to control ingredients, and the satisfaction of a truly artisanal product without artificial preservatives. It tastes distinctly richer and purer than most store-bought varieties, allowing you to experience butter in its most natural form. The hand mixer provides an efficient and less labor-intensive method compared to traditional churning or even shaking a jar, making it a perfect choice for small to medium batches.
Ingredients You’ll Need
Creating homemade butter requires just one primary ingredient, with a few optional additions to enhance flavor and texture.
- Heavy Cream: This is the star of the show. You’ll need at least 1 to 1½ cups of heavy cream or heavy whipping cream. Look for cream with a fat content of at least 36% for the best yield. The higher the fat content, the more butter you’ll get. Ensure your cream is very cold, as this helps the fat globules separate more efficiently during mixing.
- Optional: Salt: If you prefer salted butter, fine-grained salt like table salt or fine sea salt works best. You can add it after the butter has formed and been rinsed.
- Cold Water (preferably ice water): Essential for rinsing the butter to remove excess buttermilk, which prolongs its shelf life.
Essential Equipment
You don’t need a full dairy setup to make butter. A few basic kitchen tools are all it takes:
- Hand Mixer: Your primary tool. While some sources mention flat beaters, standard whisk attachments will also work, though they might take a couple of minutes longer.
- Large Mixing Bowl with High Sides: This is crucial! As the cream transforms, it can splatter significantly, especially during the separation phase. A deep bowl will help contain the mess.
- Fine-Mesh Strainer or Cheesecloth: For separating the butter from the buttermilk and for squeezing out residual liquid during rinsing.
- Rubber Spatula: Useful for scraping down the sides of the bowl and pressing excess liquid from the butter.
 Essential equipment for making homemade butter, including a hand mixer, deep bowl, strainer, and spatula.
Step-by-Step Guide to Making Butter with a Hand Mixer
Ready to churn? Follow these simple steps for delicious homemade butter:
- Prepare Your Cream and Bowl: Pour your very cold heavy cream into the large mixing bowl. It’s important that the cream is cold to ensure proper fat separation.
- Begin Mixing: Start your hand mixer on medium speed. The cream will first thicken into soft whipped cream, then stiff whipped cream. Continue mixing, being patient, as it progresses through these stages.
- Reach the Separation Point: After several minutes (typically 6 to 12 minutes, depending on your mixer’s power and beater type), the cream will start to look grainy and yellow. This is the critical moment when the butter solids begin to separate from the liquid buttermilk.
“Using a hand mixer is effective, but it can be quite splattery as the butter separates. Always use a deep bowl and consider draping a kitchen towel over your mixer and the bowl to minimize mess.” – HandmixerGuide.com Admin, Hand Mixer Technician
You’ll notice the mixer struggling a bit, and a sudden gush of liquid will appear. This is the buttermilk. - Drain the Buttermilk: Once the butter and buttermilk have clearly separated, stop mixing. Carefully pour the contents of the bowl through a fine-mesh strainer or a cheesecloth-lined sieve set over another bowl or container. Save this flavorful buttermilk for other uses!
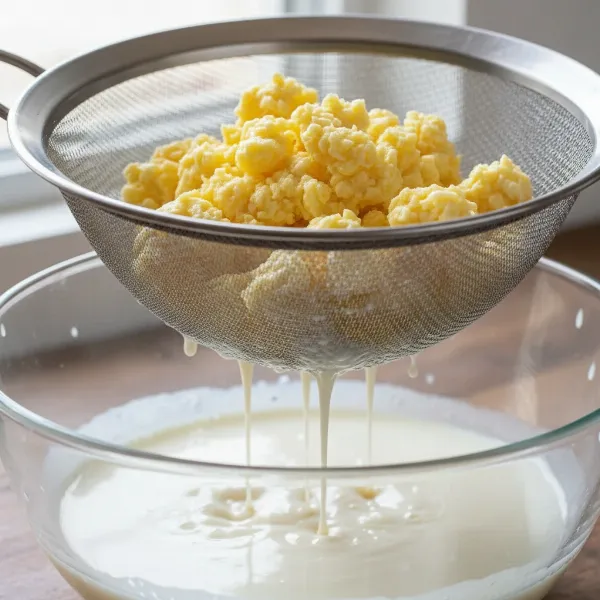 Freshly made butter solids being strained to separate from the liquid buttermilk in a bowl.
- Rinse the Butter: Transfer the butter solids back into your mixing bowl. Add a generous amount of ice-cold water (or plain cold water). Use your hand mixer on low speed, or a rubber spatula, to gently “knead” and press the butter in the water. The water will become cloudy as it extracts more buttermilk. Pour out the cloudy water and repeat this rinsing process with fresh cold water until the water runs completely clear. This step is vital for removing residual buttermilk, which can cause the butter to spoil quickly.
- Season and Shape: If you desire salted butter, add your preferred amount of salt now (a scant ¼ teaspoon per 4 ounces of butter is a good starting point, adjusting to taste). Mix it in with your hand mixer on low, or use a spatula.
- Final Squeeze: Once seasoned, gather the butter and press it firmly with a rubber spatula or your hands (wearing gloves is recommended) against the sides of the bowl or in a cheesecloth. This helps squeeze out any remaining water. Shape your butter into a log, block, or press it into a mold.
Tips for Perfect Homemade Butter
Achieving perfect homemade butter is easy with a few expert tips:
- Always Use Cold Cream: Cold cream ensures that the fat globules remain firm and separate efficiently. Warm cream can result in a longer mixing time and a softer, less firm butter.
- Choose a Deep Bowl: As mentioned, splattering can be significant. A bowl with high sides (like a stand mixer bowl or a large glass mixing bowl) is your best defense against a messy kitchen.
- Cover for Splatter: Especially as the cream transitions from whipped cream to separating butter, a kitchen towel draped loosely over the top of the bowl (around the mixer attachments) can save you from a buttermilk shower.
- Rinse Thoroughly: This cannot be stressed enough. Any leftover buttermilk will shorten your butter’s shelf life and can give it an off-flavor. Keep rinsing until the water is completely clear.
- Don’t Discard Buttermilk: The liquid you drain is true buttermilk, a valuable ingredient for baking, marinades, or even drinking.
- Time Varies: The process usually takes 6-12 minutes, but don’t rush it. Watch for the visual cues of separation rather than strictly adhering to a timer.
Customizing Your Homemade Butter (Flavored Butters)
One of the joys of homemade butter is the ability to infuse it with your favorite flavors, creating custom compound butters. Here are some ideas:
- Sweet Variations:
- Honey Butter: Mix in a drizzle of honey and a pinch of salt.
- Cinnamon Sugar Butter: Combine a touch of cinnamon and granulated sugar.
- Savory Combinations:
- Garlic Herb Butter: Fold in minced fresh garlic, chopped chives, parsley, rosemary, or dill.
- Lemon Dill Butter: Add lemon zest and fresh dill.
- Spicy Butter: A pinch of red pepper flakes or a dash of hot sauce.
- Parmesan Black Pepper Butter: Grated Parmesan cheese and freshly ground black pepper.
To make flavored butter, simply mix your desired seasonings into the freshly made, rinsed butter using a rubber spatula or a hand mixer on its lowest setting until evenly incorporated.
Storing Your Homemade Butter
Because homemade butter contains no preservatives and may have trace amounts of buttermilk if not rinsed thoroughly, proper storage is key to maintaining freshness.
- Refrigeration: Always store homemade butter in an airtight container in the refrigerator. This prevents it from absorbing odors from other foods and keeps it fresh.
- Shelf Life: When properly rinsed and stored, homemade butter can last for up to three weeks in the refrigerator. For longer storage, you can freeze it for several months.
- Importance of Rinsing: Remember, a thorough rinse is the primary factor in extending your butter’s shelf life. Skipping this step significantly reduces how long it will stay fresh.
Uses for Homemade Buttermilk
Don’t let that valuable buttermilk go to waste! It’s a fantastic ingredient with a tangy flavor profile.
- Baking: Use it in recipes for fluffy pancakes, tender biscuits, cornbread, or muffins.
- Marinades: Its acidity makes it an excellent tenderizer for chicken or other meats.
- Dressings: Incorporate it into creamy salad dressings.
- Drinking: Enjoy it chilled as a refreshing, slightly tart beverage.
Buying Guide: Total Experience for Choosing the Right Hand Mixer
While this article focuses on making butter, having the right hand mixer enhances the experience. When selecting a hand mixer, consider:
- Power (Wattage): Higher wattage offers more power, making tasks like butter churning quicker and easier. Look for at least 200-250 watts.
- Speed Settings: Multiple speed options allow for greater control, from gentle stirring to high-speed beating. A “turbo” or boost button can be useful for stubborn tasks.
- Attachments: Ensure it comes with durable beaters suitable for various tasks. Some models offer dough hooks or whisk attachments.
- Ergonomics and Weight: A comfortable grip and balanced weight reduce hand fatigue during longer mixing sessions.
- Ease of Cleaning: Detachable, dishwasher-safe beaters simplify cleanup.
Choosing a reputable brand with a good warranty also ensures reliability and longevity for your kitchen companion.
Conclusion
Making homemade butter with a hand mixer is an accessible and rewarding culinary adventure that brings incredible freshness and flavor to your table. From the simple act of transforming cream into golden butter to customizing it with your favorite seasonings, this process connects you to a time-honored tradition with modern convenience. The distinct taste and texture of your own handcrafted butter will elevate everyday meals and special occasions alike. Why settle for store-bought when you can easily create something so delicious and personalized? So, grab your hand mixer and a carton of cream – what delicious dishes will you enhance with your fresh, homemade butter?
Frequently Asked Questions
What kind of cream is best for making butter with a hand mixer?
|
Our Picks for the Best Hand mixer in 2026
As an Amazon Associate I earn from qualifying purchases.
|
||
| Num | Product | Action |
|---|---|---|
| 1 | Hamilton Beach 6-Speed Electric Hand Mixer with Whisk, Traditional Beaters, Snap-On Storage Case, 250 Watts, White |

|
| 2 | Maestri House Rechargeable Milk Frother with Stand, LunaFro Handheld Electric Foam Maker Waterproof Detachable Stainless Steel Whisk Drink Mixer Foamer for Lattes, Cappuccino |
|
| 3 | OVENTE 5-Speed Corded Electric Hand Mixer with Stainless Steel Whisks, Compact Portable Design with Snap-On Storage Case,150W Lightweight Handheld Mixer for Baking & Cooking, Black HM151B |
|
| 4 | OVENTE 5-Speed Corded Electric Hand Mixer with Stainless Steel Whisks, Compact Portable Design with Snap-On Storage Case,150W Lightweight Handheld Mixer for Baking & Cooking, White HM151W |
|
| 5 | Wellness Extract Multi-Speed Rechargeable Electric Milk Frother, Li-ion Battery Powered – Certified Safe, Ideal for Coffee, Matcha, Protein & Colostrum |
|
| 6 | KitchenAid 5-Speed Ultra Power Hand Mixer |
|
| 7 | KitchenAid 5 Ultra Power Speed Hand Mixer - KHM512, Aqua Sky |
|
| 8 | OVENTE 5-Speed Electric Hand Mixer with Stainless Steel Mixing Whisk, Snap-On Storage Case, Portable & Lightweight 150W Motor, Compact Handheld Mixer for Baking, Blending or Cooking, Red HM151R |
|
| 9 | 600W Electric Hand Mixer Kitchen Handheld Mixer 10 Speed Powerful with Turbo for Baking Cake Lightweight & Personal Electric Mixer with Egg Baking Beaters Dough Hooks, Whipping Mixing Cookies |
|
| 10 | KitchenAid 5-Speed Ultra Power Hand Mixer - KHM512, Contour Silver |
|
For the best results, use heavy cream or heavy whipping cream with a fat content of at least 36%. Ensure the cream is very cold, as this significantly aids the separation process and contributes to a firmer butter. Using a higher fat cream will also yield more butter.
How long does homemade butter last, and how should I store it?
Properly rinsed homemade butter can last up to three weeks when stored in an airtight container in the refrigerator. To prolong its shelf life, ensure you rinse out all the buttermilk thoroughly with cold water until the water runs clear. For longer storage, it can be frozen for several months.
What should I do if my cream isn’t turning into butter?
If your cream isn’t separating, it might not be cold enough, or your mixer might not be on a high enough speed. Ensure your cream is chilled, increase the mixer speed, and continue beating patiently. It can take up to 12-15 minutes, but it will eventually separate.
Can I make unsalted and salted butter with the same process?
Yes, the initial process for making both unsalted and salted butter is identical. You simply add salt after the butter has formed and been thoroughly rinsed, incorporating it to your taste. If you don’t add salt, you have unsalted butter.
What can I use the leftover buttermilk for?
The liquid separated from the butter is true buttermilk, excellent for baking! Use it in recipes for pancakes, biscuits, muffins, or cornbread to add tenderness and a slight tang. It can also be used in marinades or as a refreshing drink.