Even the most meticulous home bakers find themselves facing a common kitchen dilemma: a hand mixer that, despite its best efforts, harbors hidden grime and sticky residue deep within its casing. Over time, flour dust, butter splatters, and batter drips can sneak into crevices and ventilation slots, leading to unpleasant odors, compromised performance, and even a shortened lifespan for your beloved appliance. If surface cleaning isn’t cutting it anymore, it’s time to learn how to safely and effectively disassemble your hand mixer for a truly deep and hygienic clean.
Understanding Your Hand Mixer’s Anatomy for Deep Cleaning
A hand mixer, at its core, is a simple yet powerful kitchen tool. It typically consists of a motor housed within a plastic casing, equipped with attachment ports for beaters, whisks, and dough hooks. Ventilation slots keep the motor from overheating, and control buttons allow you to adjust speed and eject attachments. While the external parts and attachments are easy to clean, the internal components – particularly the gears and the areas around the motor – can accumulate stubborn food particles and grease. This hidden buildup isn’t just unsightly; it can create a breeding ground for bacteria, impede the motor’s efficiency, and reduce the overall lifespan of your appliance. A deep clean requires going beyond the surface to access these often-neglected internal areas.
Why Disassemble for Deep Cleaning?
Disassembling your hand mixer offers several compelling benefits that go beyond a quick wipe-down. The primary advantage is superior hygiene. Food particles, especially sugary or fatty residues, can attract pests and foster bacterial growth, leading to unpleasant smells and potential health risks. A deep clean ensures every hidden nook is free from contaminants. Secondly, it boosts performance and longevity. Accumulated grime can obstruct vents, causing the motor to overheat, or interfere with the smooth operation of the internal gears. By removing this buildup, you allow the motor to run more efficiently, reduce strain on components, and significantly extend your mixer’s working life. Lastly, it prevents breakdowns. Addressing internal issues like sticky gears or blocked fans proactively can save you from costly repairs or the need for premature replacement. However, it’s crucial to understand that disassembly carries risks, including voiding warranties or damaging delicate components if not performed carefully. Only proceed if you are comfortable with basic mechanical tasks and understand that not all hand mixers are designed for easy user disassembly.
Essential Tools and Safety Precautions
Before you begin the disassembly process, gather the necessary tools and prioritize safety. Your essential toolkit should include a set of screwdrivers (Phillips head and possibly Torx or flathead, depending on your mixer model), a plastic prying tool (like a spudger or a guitar pick) to separate plastic casings without damage, and a small, soft brush (an old toothbrush works well) for cleaning. For the actual cleaning, have some mild dish soap, warm water, and clean cloths readily available. You might also find compressed air useful for clearing dust from vents.
Safety Precautions are paramount:
- Always Unplug: Before doing anything, ensure your hand mixer is completely disconnected from the power source. This is the most critical safety step to prevent electric shock.
- Organized Workspace: Lay out your tools and components on a clean, well-lit surface. Keep track of screws and small parts as you remove them, perhaps using a magnetic mat or small containers.
- Gentle Handling: Plastic components can be brittle. Apply gentle, even pressure when prying or unscrewing.
- Avoid Water on Electronics: Never immerse the motor housing or any electrical components in water.
- Gloves: Wear disposable gloves to protect your hands from grease and cleaning agents.
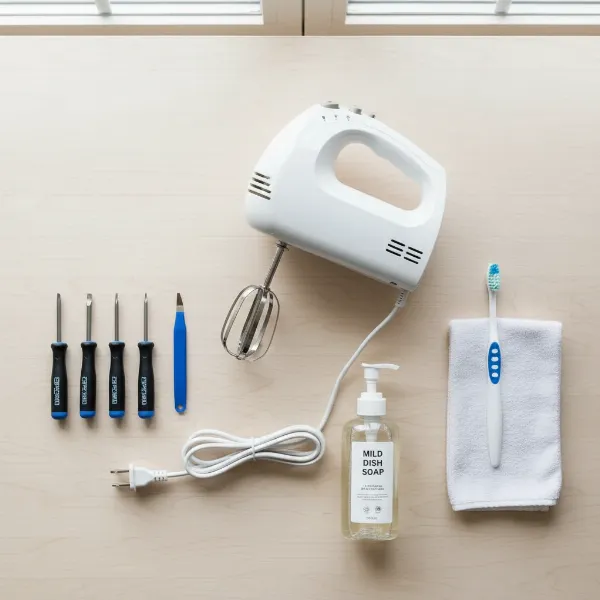 Essential tools and safety precautions for hand mixer deep cleaning and disassembly.
Step-by-Step Guide: How to Disassemble a Hand Mixer
Disassembling a hand mixer can vary significantly between brands and models, but the general principles remain consistent. Always consult your user manual first if available, as some manufacturers explicitly outline cleaning methods or provide warnings against disassembly. If a manual isn’t helpful, approach the process with caution.
-
Initial Preparation:
- Ensure the mixer is unplugged from the wall outlet.
- Remove all detachable accessories, such as beaters, whisks, and dough hooks. Press the eject button to release them.
-
Locating Fasteners:
- Inspect the exterior of the hand mixer for visible screws. These are commonly found on the handle, the underside of the unit, or around the seam where the two halves of the casing meet. They might be Phillips head, flathead, or sometimes security screws requiring specialized bits (like Torx with a pin in the center).
- Check under any rubber feet or adhesive labels, as screws are often hidden beneath them for aesthetic purposes. Carefully peel back labels or rubber pads to reveal potential screw locations.
-
Dealing with Hidden Clips and Latches:
- Many hand mixers utilize plastic clips or latches in addition to, or instead of, screws to hold the casing together.
- Once all visible screws are removed, gently run a plastic prying tool or a thin, sturdy object (like a credit card or guitar pick) along the seam of the casing. Listen for slight clicks as clips release.
- Apply gentle, consistent pressure. Avoid forcing the casing open, as this can easily break plastic tabs. If it feels stuck, re-examine for any missed screws or stubborn clips.
-
Separating the Casing:
- Once all fasteners and clips are disengaged, carefully split the two halves of the hand mixer’s casing. They might be connected by internal wires, so do not pull them apart forcefully. Open them like a book, or slowly lift one half away from the other, being mindful of any attached wires.
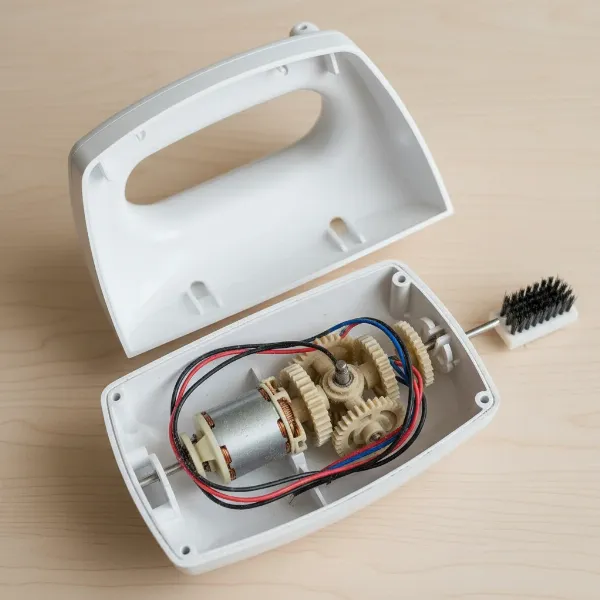 Opened hand mixer casing revealing motor, wires, and gear assembly for deep cleaning.
- Accessing Internal Components:
- Inside, you’ll see the motor, wiring, and often a gear assembly connected to the attachment shafts.
- Crucial Warning: Unless you are an experienced electrician or repair technician, do not attempt to disassemble the motor itself or tamper with the electrical wiring. These components are complex, sensitive, and can pose a significant electrical hazard if improperly handled. Your deep cleaning should focus on the casing and the accessible mechanical parts, like the gear assembly.
Deep Cleaning the Internal Components
With the casing open, you can now thoroughly clean the internal areas that are typically inaccessible.
- Cleaning the Casing:
- Use a damp cloth with a small amount of mild dish soap to wipe down the inside surfaces of the plastic casing. Pay special attention to areas with dried batter, grease, or sticky residue.
- Use a small brush (like an old toothbrush) to scrub away stubborn grime from crevices and corners.
- Rinse the cloth thoroughly and wipe again to remove any soap residue. Ensure the casing parts are completely dry before reassembly.
- Cleaning the Gear Assembly:
- The gear assembly is usually located near the attachment shafts. Carefully remove any visible debris, such as hair, dust, or dried food particles, using tweezers or a small brush.
- If the gears appear excessively greasy or stiff, you can carefully wipe away old grease with a dry cloth or a cotton swab. Do not use water or solvents directly on the gears unless specifically recommended by the manufacturer, as this can wash away essential lubrication or damage plastic parts.
- Note: Re-lubricating gears is generally not recommended for the average user, as it requires specific food-grade grease and knowledge of proper application. If the gears are severely gunked up and performance is affected, professional servicing might be a better option.
- Cleaning Vents and Fan:
- Use compressed air to blow dust and debris out of the ventilation slots and from around the motor fan (if visible and accessible without further disassembly).
- Use a small brush to gently clean around the fan blades, being careful not to bend them. Clearing these areas improves airflow and prevents overheating.
Reassembly: Putting Your Hand Mixer Back Together
Once all components are sparkling clean and completely dry, it’s time to reassemble your hand mixer. This process is essentially the reverse of disassembly.
- Ensure All Parts Are Dry: Absolutely vital. Any moisture inside the mixer can lead to electrical shorts and damage. Let components air dry completely, or gently wipe them down until no moisture remains.
- Align Internal Components: Carefully place the motor, gear assembly, and any other internal components back into their correct positions within one half of the casing. Ensure all wires are neatly tucked away and not pinched or stressed.
- Join the Casing Halves: Carefully bring the two halves of the casing together. Ensure the alignment is perfect, and any clips or tabs engage smoothly. You should hear gentle clicks as the clips lock into place. Do not force them.
- Secure Screws and Fasteners: Reinsert and tighten all screws that you removed. Do not overtighten, as this can strip the plastic threads.
- Reattach Rubber Feet/Labels: If you peeled back any rubber feet or labels, press them firmly back into place.
- Test Functionality: Plug the hand mixer back into the power outlet. Insert the beaters and turn it on to a low speed to ensure it operates smoothly and correctly. Listen for any unusual noises.
When to Call a Professional
While deep cleaning can be a rewarding DIY task, there are times when it’s best to call in a professional. If your hand mixer is still under warranty, disassembling it yourself will almost certainly void it. In such cases, contact customer service for repair options. If you encounter specialized screws that you don’t have the tools for, or if the internal components seem overly complex or fragile, it’s wiser to seek professional help to avoid irreversible damage. Any issues related to the motor, power cord, or electrical components should always be handled by a qualified technician due to safety risks.
Maintaining Your Hand Mixer for Longevity
Regular maintenance is key to minimizing the need for frequent deep disassembly. After each use, remove the attachments and wash them thoroughly. Wipe down the exterior of the motor housing with a damp cloth, paying attention to the attachment ports and ventilation areas. If spills occur, clean them immediately before they dry and become stubborn. Storing your hand mixer in a dry, clean place will also prevent dust and debris from accumulating. By adopting these simple habits, you can keep your hand mixer in top condition, ensuring it performs flawlessly for years to come without constant internal cleaning.
Frequently Asked Questions
Can I put my hand mixer’s motor unit in the dishwasher?
|
Our Picks for the Best Hand mixer in 2026
As an Amazon Associate I earn from qualifying purchases.
|
||
| Num | Product | Action |
|---|---|---|
| 1 | Wellness Extract Multi-Speed Rechargeable Electric Milk Frother, Li-ion Battery Powered – Certified Safe, Ideal for Coffee, Matcha, Protein & Colostrum |

|
| 2 | Hamilton Beach 6-Speed Electric Hand Mixer with Whisk, Traditional Beaters, Snap-On Storage Case, 250 Watts, White |
|
| 3 | OVENTE 5-Speed Corded Electric Hand Mixer with Stainless Steel Whisks, Compact Portable Design with Snap-On Storage Case,150W Lightweight Handheld Mixer for Baking & Cooking, Black HM151B |
|
| 4 | KitchenAid 5 Ultra Power Speed Hand Mixer - KHM512, Aqua Sky |
|
| 5 | 600W Electric Hand Mixer Kitchen Handheld Mixer 10 Speed Powerful with Turbo for Baking Cake Lightweight & Personal Electric Mixer with Egg Baking Beaters Dough Hooks, Whipping Mixing Cookies |
|
| 6 | OVENTE 5-Speed Corded Electric Hand Mixer with Stainless Steel Whisks, Compact Portable Design with Snap-On Storage Case,150W Lightweight Handheld Mixer for Baking & Cooking, White HM151W |
|
| 7 | KitchenAid 5-Speed Ultra Power Hand Mixer - KHM512, Contour Silver |
|
| 8 | Maestri House Rechargeable Milk Frother with Stand, LunaFro Handheld Electric Foam Maker Waterproof Detachable Stainless Steel Whisk Drink Mixer Foamer for Lattes, Cappuccino |
|
| 9 | KitchenAid 5-Speed Ultra Power Hand Mixer |
|
| 10 | OVENTE 5-Speed Electric Hand Mixer with Stainless Steel Mixing Whisk, Snap-On Storage Case, Portable & Lightweight 150W Motor, Compact Handheld Mixer for Baking, Blending or Cooking, Red HM151R |
|
No, absolutely not. The motor unit contains electrical components that would be severely damaged by water and detergent, leading to an electrical hazard and permanent malfunction. Only detachable, dishwasher-safe attachments should be cleaned in a dishwasher.
What should I do if my hand mixer is making strange noises after cleaning?
If your hand mixer makes unusual noises after reassembly, immediately unplug it. It’s possible that a component is not aligned correctly, a wire is pinched, or a screw is loose. Re-open the casing and carefully re-check all connections and placements before testing again.
How often should I deep clean my hand mixer?
The frequency of deep cleaning depends on your usage. For light, occasional use, once a year might suffice. If you use your hand mixer frequently for heavy-duty tasks or with sticky ingredients, consider a deep clean every six months or whenever you notice performance issues or unusual odors. Regular external cleaning will reduce the need for full disassembly.