Accidents happen in the kitchen, and one of the most disheartening is watching your trusty hand mixer take an unexpected plunge into water. Whether it’s a sink full of suds, a bowl of batter, or a spilled drink, a wet hand mixer can seem like a lost cause. But before you panic and declare your beloved appliance beyond repair, know that with swift and careful action, you might just be able to bring it back from the brink. As a seasoned kitchen appliance technician, I’ve seen countless cases of water-damaged electronics, and I’m here to share the crucial steps and expert advice to guide you through saving your hand mixer and preventing future mishaps.
The Immediate Aftermath: What to Do First
When your hand mixer unexpectedly encounters water, your immediate actions are paramount. The quicker you react, the higher your chances of recovery.
The very first and most critical step is to unplug the hand mixer immediately from the power outlet. This action is non-negotiable for your safety and the device’s potential recovery. If the mixer is still connected to an electrical source while wet, it poses a significant risk of electric shock and can cause instant, irreparable damage through short-circuiting. Do not attempt to turn the mixer on to check if it still works; this is a common, dangerous mistake. If it was already on, switch it off and unplug it as quickly as possible.
Next, assess the situation. Was it a mere splash, or was the hand mixer fully submerged? The extent of water exposure will influence the drying process and the likelihood of success. Even a small amount of water in the wrong place can be problematic.
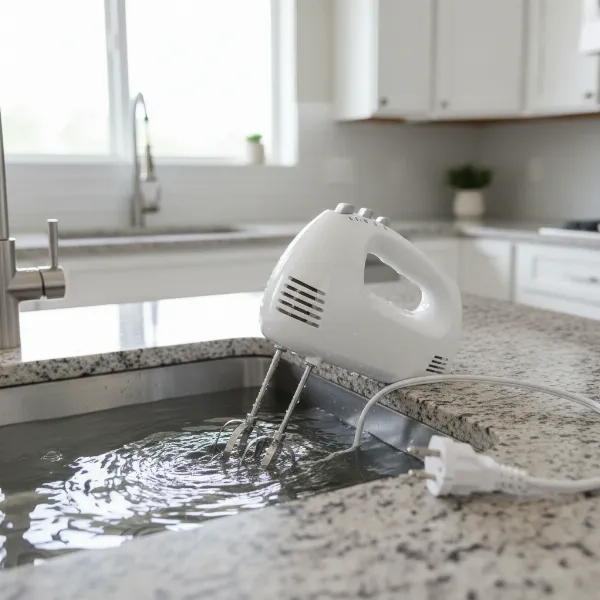 Hand mixer partially submerged in water, cord unplugged, illustrating immediate action.
Understanding Water Damage: Why Quick Action Matters
Water is a formidable adversary for electronics, primarily because it’s an excellent conductor of electricity. When power runs through a wet device, water acts as a bridge, short-circuiting pathways that aren’t meant to connect. This can lead to instant component failure, often causing visible burns or melted parts.
Beyond the immediate electrical hazard, water also introduces the threat of corrosion. The minerals and impurities present in tap water can accelerate the oxidation of metal components and circuit boards. This corrosion can occur subtly over hours or days, leading to intermittent failures, degraded performance, or complete device breakdown even after the water has dried. The motor, being the heart of the hand mixer, is particularly vulnerable. Water can seep into its windings, bearings, and brushes, causing rust, friction, and ultimately motor failure.
Quick action is essential to prevent these damaging effects from taking hold. The goal is to remove all moisture and impurities before they can wreak havoc on the internal electronics.
Step-by-Step Guide to Drying Your Hand Mixer
Successfully drying a hand mixer requires patience, precision, and adherence to proper techniques. Rushing the process or using incorrect methods can cause more harm than good.
Initial External Drying
|
Our Picks for the Best Hand mixer in 2026
As an Amazon Associate I earn from qualifying purchases.
|
||
| Num | Product | Action |
|---|---|---|
| 1 | Hamilton Beach 6-Speed Electric Hand Mixer with Whisk, Traditional Beaters, Snap-On Storage Case, 250 Watts, White |

|
| 2 | 600W Electric Hand Mixer Kitchen Handheld Mixer 10 Speed Powerful with Turbo for Baking Cake Lightweight & Personal Electric Mixer with Egg Baking Beaters Dough Hooks, Whipping Mixing Cookies |
|
| 3 | OVENTE 5-Speed Corded Electric Hand Mixer with Stainless Steel Whisks, Compact Portable Design with Snap-On Storage Case,150W Lightweight Handheld Mixer for Baking & Cooking, Black HM151B |
|
| 4 | KitchenAid 5-Speed Ultra Power Hand Mixer - KHM512, Contour Silver |
|
| 5 | KitchenAid 5 Ultra Power Speed Hand Mixer - KHM512, Aqua Sky |
|
| 6 | Maestri House Rechargeable Milk Frother with Stand, LunaFro Handheld Electric Foam Maker Waterproof Detachable Stainless Steel Whisk Drink Mixer Foamer for Lattes, Cappuccino |
|
| 7 | Wellness Extract Multi-Speed Rechargeable Electric Milk Frother, Li-ion Battery Powered – Certified Safe, Ideal for Coffee, Matcha, Protein & Colostrum |
|
| 8 | KitchenAid 5-Speed Ultra Power Hand Mixer |
|
| 9 | OVENTE 5-Speed Corded Electric Hand Mixer with Stainless Steel Whisks, Compact Portable Design with Snap-On Storage Case,150W Lightweight Handheld Mixer for Baking & Cooking, White HM151W |
|
| 10 | OVENTE 5-Speed Electric Hand Mixer with Stainless Steel Mixing Whisk, Snap-On Storage Case, Portable & Lightweight 150W Motor, Compact Handheld Mixer for Baking, Blending or Cooking, Red HM151R |
|
Once unplugged, immediately use a soft, absorbent cloth or paper towel to wipe down the exterior of the hand mixer. Remove as much surface water as possible. Gently shake the mixer to dislodge any larger drops of water that might be trapped in crevices or around the attachment ports. Avoid vigorous shaking, which could force water deeper inside.
Disassembly for Deeper Drying
For the best chance of recovery, carefully disassembling your hand mixer is highly recommended, if you are comfortable doing so. This allows air to reach internal components and helps you visually inspect for moisture.
Safety Precautions for Disassembly:
- Always ensure the mixer is unplugged.
- Consult your user manual for disassembly instructions, if available. Some models are not designed to be opened by users.
- Use appropriate screwdrivers and tools.
- Keep track of all screws and parts, perhaps by laying them out in the order they were removed or placing them in small, labeled containers.
Once the casing is open, you can visually inspect the motor, circuit board, and wiring for any visible water droplets. This direct access significantly improves drying efficiency.
Internal Moisture Removal Techniques
With the internal components exposed (or as exposed as possible), you can now focus on drawing out the hidden moisture.
Air Drying: The Safest Method
Air drying is universally considered the safest and most reliable method for water-damaged electronics.
- Location and Airflow: Place the disassembled (or opened) hand mixer in a dry, warm environment with good air circulation. A room with low humidity is ideal.
- Using a Fan: To expedite the process, position a small fan to blow air gently over the internal components. This helps evaporate moisture more quickly. Ensure the fan is on a low setting to avoid disturbing delicate parts.
- Patience is Key: This process takes time, often several days to a week, depending on the extent of water exposure and environmental humidity. Do not rush it.
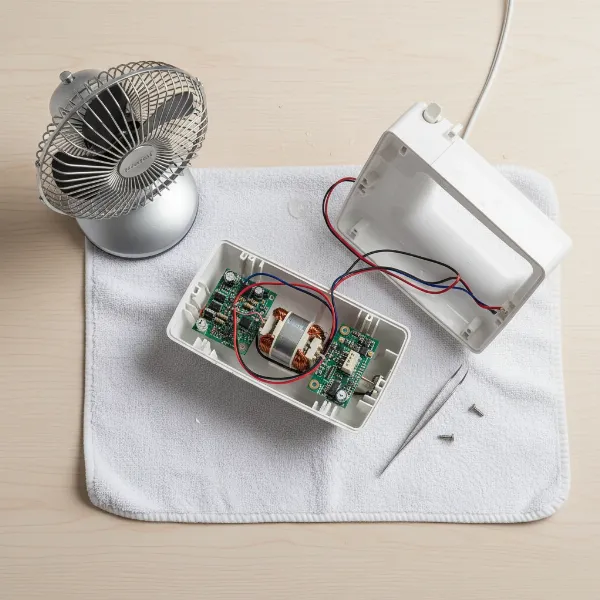 Disassembled hand mixer components laid out on a towel, air drying with a small fan.
Desiccants: Drawing Out Hidden Moisture
Desiccants are substances that absorb moisture from their surroundings. They can be incredibly effective for internal moisture.
- Silica Gel Packets: These are the small packets often found in new electronic products or shoe boxes. If you have a good quantity of them, place your hand mixer (and its disassembled parts) in an airtight container filled with silica gel packets.
- Uncooked Rice: While commonly suggested, uncooked rice is a less effective desiccant than silica gel. It can also leave starchy dust in delicate components, which might cause new problems. If using rice, ensure it’s completely dry and consider placing the mixer in a breathable bag (like a coffee filter or thin cloth) before submerging it in rice to minimize dust ingress.
- How to Create a Desiccant Chamber: Place the hand mixer and desiccant in a sealed container or bag for at least 24-48 hours, or even up to a week for complete drying. The airtight environment helps the desiccant work more efficiently.
Isopropyl Alcohol (99%): When and How to Use It
For visible corrosion or if you suspect water has reached the circuit board, 99% isopropyl alcohol can be a valuable tool. It displaces water and evaporates quickly without leaving residues.
- Cleaning Contacts and Circuit Boards: Use a soft-bristled brush or a cotton swab lightly dampened with 99% isopropyl alcohol to gently clean circuit boards, contact points, and any areas showing signs of corrosion.
- Important Considerations and Cautions: Ensure the alcohol used is 99% pure, as lower concentrations contain more water. Use sparingly and allow ample time for it to evaporate completely before reassembly. Avoid using it on plastic parts that might react negatively or on any glued components.
What to AVOID During the Drying Process
Certain methods can do more harm than good and should be strictly avoided:
- No High Heat: Never use a hairdryer on a hot setting, an oven, microwave, or direct sunlight to dry your hand mixer. Excessive heat can warp plastic components, melt insulation, damage sensitive electronic parts, and worsen corrosion.
- No Compressed Air: While it might seem intuitive, using compressed air can actually force water deeper into intricate components, making it harder to remove and potentially trapping it in critical areas.
Reassembly and Testing: The Moment of Truth
After days of careful drying, it’s time for the moment of truth.
Ensuring Complete Dryness
Before reassembling anything, make absolutely sure that all components are completely dry. There should be no visible moisture, and the parts should feel completely dry to the touch. Any lingering dampness can lead to short circuits upon power-up.
Careful Reassembly
Carefully reassemble your hand mixer, ensuring all screws are in place and connections are secure. Double-check that no wires are pinched or components are out of alignment.
First Power-Up: Safety First
Plug the reassembled hand mixer into a Ground Fault Circuit Interrupter (GFCI) outlet if possible. A GFCI outlet can detect ground faults and cut power, providing an extra layer of safety in case residual moisture causes a short. Turn the mixer on to its lowest setting. Listen for any unusual noises, watch for smoke, or feel for excessive heat. If anything seems amiss, immediately unplug it.
Testing Functionality
If it powers on normally, test all speeds and functions. Allow it to run for a short period, monitoring for any irregular behavior. If it operates without issues, congratulations! You’ve likely saved your hand mixer. However, remain vigilant during subsequent uses, as some issues might manifest later.
When to Call It Quits: Recognizing Irreparable Damage
Despite your best efforts, sometimes a water-damaged hand mixer simply cannot be saved. It’s important to recognize when to replace it for safety and practicality.
- Persistent Malfunctions: If the mixer exhibits intermittent power, inconsistent speeds, or strange behaviors even after thorough drying, it’s a strong indicator of permanent internal damage.
- Visible Corrosion or Burn Marks: If you observed significant corrosion, burn marks, or melted components during disassembly, the damage is likely too severe for a DIY fix.
- Smoke, Sparks, or Unusual Noises: Any signs of smoke, sparks, a burning smell, or loud grinding/ticking noises during the first power-up (or subsequent uses) are critical warnings. Immediately unplug the device and consider it unsafe to use.
- The Cost-Benefit of Repair vs. Replacement: For many consumer-grade hand mixers, the cost and effort of professional repair may outweigh the price of a new unit. Remember, water damage usually voids the manufacturer’s warranty.
“While immediate intervention is crucial, knowing when to stop and consider replacement is equally important for both safety and your peace of mind. A damaged hand mixer isn’t worth the risk.” – John Smith, Senior Appliance Repair Technician
Preventing Future Water Mishaps
The best way to deal with a wet hand mixer is to prevent it from happening in the first place.
- Safe Storage Practices: Always store your hand mixer in a dry cabinet or drawer, away from sinks, dishwashers, and other water sources.
- Working Away from Water Sources: When using your hand mixer, keep liquids, particularly cleaning water, at a safe distance. Create a dry, clear workspace.
- Immediate Clean-Up of Spills: If any liquid spills near your mixer, clean it up instantly to prevent it from reaching the appliance.
Conclusion
A hand mixer dropped in water doesn’t necessarily spell its end. By acting swiftly to unplug it, carefully drying it out using appropriate methods like air drying or desiccants, and avoiding harmful techniques, you can significantly increase your chances of restoring it to working order. Always prioritize safety, and never power on a device you suspect is still wet. While some damage might be irreversible, a diligent approach can often save your appliance and spare you the expense of a new one. Remember, prevention is always easier than repair, so cultivate safe kitchen habits to keep your hand mixer dry and functioning for years to come.
What steps do you take to protect your kitchen gadgets from water?
Frequently Asked Questions
Can rice really save a wet hand mixer?
Uncooked rice can act as a desiccant, absorbing some moisture from a wet hand mixer. However, its effectiveness is often overstated compared to professional desiccants like silica gel, and it may leave starchy dust. For best results, combine it with air drying or consider opening the mixer’s casing if possible.
How long does a hand mixer need to dry after falling in water?
The drying time varies depending on the extent of water exposure and environmental conditions. Generally, a hand mixer should be allowed to dry for at least 24 to 72 hours, and often up to a week, especially if it was fully submerged or cannot be easily disassembled. Patience is critical for complete moisture evaporation.
Is it safe to use a hand mixer that was once water damaged?
It can be safe to use if it has been thoroughly dried, reassembled correctly, and functions perfectly without any signs of malfunction, strange noises, smells, or overheating during testing. However, if any issues persist, or if you are unsure about its integrity, it is safer to replace it to avoid potential electrical hazards.
Does water damage void the warranty?
Yes, in almost all cases, water damage will void the manufacturer’s warranty for electronic appliances like hand mixers. Manufacturers often include liquid contact indicators inside devices, which change color when exposed to moisture, making water damage easily detectable and ineligible for warranty claims.