Few things are as frustrating in the kitchen as being midway through a baking project and encountering a stubborn hand mixer. You’ve just whipped up a perfect batter, but now the beaters are stuck, refusing to eject with the press of a button. This common annoyance can derail your culinary flow, leaving you feeling helpless. But don’t fret; with over a decade of hands-on experience with countless mixer models, I understand these hiccups intimately. This comprehensive guide will walk you through practical, expert-backed steps to free a jammed beater eject button, ensuring your hand mixer is always ready for your next culinary adventure.
Understanding Your Hand Mixer’s Eject Mechanism
Every hand mixer relies on a simple yet effective eject mechanism to release its beaters. When you press the eject button, it typically disengages a locking pin or lever system, allowing the beaters to slide out. This design is intended for convenience, making cleanup and attachment changes quick and easy. However, over time, various factors can impede this smooth operation, causing the button to stick and the beaters to remain firmly in place. A fully functional eject button isn’t just about convenience; it’s crucial for maintaining the mixer’s longevity and ensuring safe use.
Common Reasons Your Eject Button Gets Stuck
A stuck eject button usually points to one of a few common culprits. Understanding these can help you pinpoint the problem and apply the right solution.
- Food Debris Buildup: This is perhaps the most frequent offender. Batter, dough, or other ingredients can seep into the beater cavity and around the eject mechanism. Over time, this residue hardens, acting like glue and preventing the button from fully depressing or the beaters from releasing.
- Lack of Lubrication: The moving parts within the eject mechanism require occasional lubrication to function smoothly. Without it, friction can cause components to bind, making the button stiff and difficult to operate.
- Infrequent Use or Beaters Left in Too Long: If your mixer sits unused for extended periods with the beaters still inserted, any minor residue can solidify more firmly, or the metal components might subtly seize together due to lack of movement.
- Button Not Fully Depressed: Sometimes, the issue isn’t a jam but simply not pressing the button with enough force or completely. The mechanism requires a full depression to disengage the beaters.
- Minor Mechanical Misalignment: In some cases, slight shifts in the internal components or manufacturing tolerances, especially in newer mixers, can cause the eject mechanism to be stiff or bind temporarily.
 A close-up of a hand mixer with beaters stuck, showing food debris around the eject mechanism.
Safety First: Before You Start Troubleshooting
Before attempting any troubleshooting or repair on your hand mixer, safety must be your absolute priority. Always, without exception, unplug your hand mixer from the power outlet. This prevents accidental activation, reducing the risk of injury from rotating beaters or electrical shock. Work in a well-lit area where you can clearly see the components of your mixer.
Step-by-Step Guide to Freeing a Stuck Eject Button
Here’s a practical, step-by-step approach to resolve a stuck eject button on your hand mixer. Approach each step gently and patiently to avoid causing further damage.
1. Ensure the Button is Fully Engaged
|
Our Picks for the Best Hand mixer in 2026
As an Amazon Associate I earn from qualifying purchases.
|
||
| Num | Product | Action |
|---|---|---|
| 1 | KitchenAid 5-Speed Ultra Power Hand Mixer - KHM512, Contour Silver |

|
| 2 | Wellness Extract Multi-Speed Rechargeable Electric Milk Frother, Li-ion Battery Powered – Certified Safe, Ideal for Coffee, Matcha, Protein & Colostrum |
|
| 3 | OVENTE 5-Speed Corded Electric Hand Mixer with Stainless Steel Whisks, Compact Portable Design with Snap-On Storage Case,150W Lightweight Handheld Mixer for Baking & Cooking, Black HM151B |
|
| 4 | OVENTE 5-Speed Electric Hand Mixer with Stainless Steel Mixing Whisk, Snap-On Storage Case, Portable & Lightweight 150W Motor, Compact Handheld Mixer for Baking, Blending or Cooking, Red HM151R |
|
| 5 | Hamilton Beach 6-Speed Electric Hand Mixer with Whisk, Traditional Beaters, Snap-On Storage Case, 250 Watts, White |
|
| 6 | Maestri House Rechargeable Milk Frother with Stand, LunaFro Handheld Electric Foam Maker Waterproof Detachable Stainless Steel Whisk Drink Mixer Foamer for Lattes, Cappuccino |
|
| 7 | 600W Electric Hand Mixer Kitchen Handheld Mixer 10 Speed Powerful with Turbo for Baking Cake Lightweight & Personal Electric Mixer with Egg Baking Beaters Dough Hooks, Whipping Mixing Cookies |
|
| 8 | OVENTE 5-Speed Corded Electric Hand Mixer with Stainless Steel Whisks, Compact Portable Design with Snap-On Storage Case,150W Lightweight Handheld Mixer for Baking & Cooking, White HM151W |
|
| 9 | KitchenAid 5-Speed Ultra Power Hand Mixer |
|
| 10 | KitchenAid 5 Ultra Power Speed Hand Mixer - KHM512, Aqua Sky |
|
Begin by confirming you’re pressing the eject button completely. Sometimes, a superficial press isn’t enough to trigger the mechanism. Apply firm, steady pressure, ensuring the button travels its full range of motion. If you notice any resistance, don’t force it immediately, but ensure your finger is covering the entire button surface.
2. Gentle Wiggling and Tapping
With the button fully depressed, try gently wiggling the beaters from side to side or rotating them slightly. This subtle movement can sometimes dislodge minor blockages or realign internal components that are binding. You can also try gently tapping the side of the mixer housing near the eject button with your palm. A light percussive force can occasionally free a sticky mechanism.
3. The “Upside Down” Method
For particularly stubborn beaters, try this clever trick: turn your hand mixer upside down. While pressing the eject button firmly, gently push the ends of the beaters against a sturdy, flat surface like a countertop. The leverage and slight compression can often help release the beaters, especially if a slight vacuum or friction is holding them in place.
4. Cleaning for Debris
If the button still won’t budge, hardened food debris is likely the culprit.
- Visual Inspection: Carefully examine the area around the base of the beaters where they insert into the mixer, and around the eject button itself. Look for any visible dried batter, dough, or other food particles.
- Targeted Cleaning: Use a damp, soft cloth to wipe away any fresh or easily removable residue. For dried, stubborn bits, a toothpick, a small, stiff brush (like an old toothbrush), or a cotton swab can be effective tools to gently scrape and pick away the hardened material from crevices and around the beater shafts. Avoid using metal objects that could scratch or damage the plastic or metal parts.
- Warm Compress for Hardened Goo: If the beaters are heavily encrusted, moisten a small towel with warm water and wrap it around the base of the beaters and the entry points for about 5-10 minutes. The warmth and moisture can help soften dried-on food, making it easier to remove. After soaking, gently try to clean and eject again.
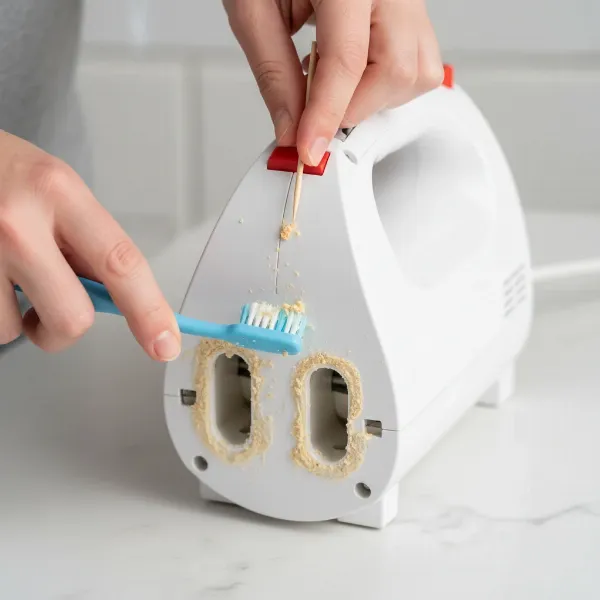 A person cleaning a hand mixer's beater insertion points and eject button with a small brush.
5. Lubrication
Once you’ve cleared any visible debris, lubrication can significantly improve the eject mechanism’s function.
- Choose the Right Lubricant: Food-grade mineral oil is an excellent choice for mixer components as it’s non-toxic and won’t go rancid. Avoid vegetable oils, which can become sticky and attract more debris over time. While some might suggest products like WD-40, it’s generally best to stick to mineral oil for appliances that come into contact with food.
- Application: Dab a small amount of mineral oil onto a paper towel or cotton swab. Carefully apply it to the ends of the beater shafts and around the inside edges of the beater insertion points.
- Test and Repeat: Insert the beaters back into the mixer (if you managed to get them out). Press the eject button and pull the beaters out a few times. This action helps distribute the lubricant and works it into the mechanism, making future ejections smoother.
6. Addressing Stiff New Mixers/Beaters
If your hand mixer is brand new and the eject button feels stiff, it’s not uncommon. New parts sometimes require a “break-in” period. Continue using the mixer and practicing gentle insertion and ejection. The parts will naturally loosen up with use. Applying a bit of mineral oil as described above can also accelerate this process.
7. When to Call a Professional
Despite your best efforts, some issues might be beyond a DIY fix. If you’ve tried all the troubleshooting steps and the eject button remains stubbornly stuck, or if you suspect internal damage or a broken spring, it’s time to seek professional assistance. Forcing a stuck mechanism can cause more extensive damage. Consult your mixer’s user manual for warranty information or contact the manufacturer’s customer service for guidance on authorized service centers.
Preventative Measures to Avoid Future Jams
An ounce of prevention is worth a pound of cure, especially with kitchen appliances. Follow these tips to keep your hand mixer’s eject button operating smoothly for years to come:
- Clean Beaters Immediately: After each use, remove and thoroughly clean your beaters right away. Don’t let batter or dough dry on them, as this is the primary cause of sticky residue.
- Store Beaters Separately: Whenever possible, store beaters detached from the mixer. This prevents any inadvertent accumulation of dust or debris in the cavities and avoids unnecessary strain on the eject mechanism.
- Regular Light Lubrication: Every few months, or if you notice the button feeling stiff, apply a small amount of food-grade mineral oil to the beater shafts and insertion points. This keeps the internal components moving freely.
- Proper Insertion and Removal Technique: Always ensure beaters are inserted correctly and fully engaged before mixing. When ejecting, press the button firmly and gently pull the beaters straight out, avoiding twisting or excessive force.
Conclusion
A stuck beater eject button can be a minor inconvenience, but it doesn’t have to signal the end of your hand mixer. By understanding the common causes and following these straightforward troubleshooting and maintenance steps, you can often resolve the issue yourself. Remember to prioritize safety by unplugging your appliance, and approach each step with patience. Regular cleaning and occasional lubrication are your best allies in keeping your hand mixer in top working order, ensuring it remains a reliable companion for all your baking endeavors. What’s your go-to kitchen hack for keeping appliances running smoothly?
Frequently Asked Questions
Can I use cooking oil to lubricate my mixer’s eject mechanism?
It is generally not recommended to use cooking oils (like olive oil or vegetable oil) for lubricating your mixer. These oils can turn sticky or rancid over time, potentially worsening the problem by attracting more dust and debris, and possibly leading to unpleasant odors. Food-grade mineral oil is a much safer and more effective alternative for appliance lubrication.
How often should I clean my mixer’s eject mechanism?
The frequency depends on your usage. If you use your Hand Mixer regularly, a quick wipe-down of the beater insertion points after each use is good practice. A deeper cleaning of the eject mechanism itself, including light lubrication, is advisable every 3-6 months, or whenever you notice the button becoming stiff or difficult to press. Consistent cleaning after messy jobs will significantly reduce the need for intensive troubleshooting.